Custom Search

Thursday, October 8, 2009

Learning Baitcasting Reel - First Overhead Cast

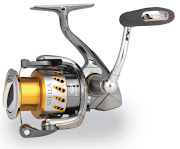
Hold the rod horizontally in front of you. The handles should be on top of the reel, that is, pointing UP if you're right-handed (using a right-handed reel). This is similar to the way you would hold a tennis racket and gives the widest possible range of movement to your wrist.


With your thumb applying pressure directly on the spool, unlock it, using whatever mechanism is used (thumb bar, pushbutton, etc.). The pressure of your thumb against the spool is what's preventing it from moving at this point.


Bring the rod up over your shoulder to approximately the 2 o'clock position. Your upper arm should barely move for this; use your forearm and your wrist.


Now bring the rod forward as if you were trying to hammer a nail in a wall in front of you, but use a smooth motion; this is NOT the time for forceful movements! As the rod reaches the 12 o'clock position, take your thumb off the spool, thus releasing it to feed line out as the casting weight flies out... and falls far short of what you you are hoping for - Don't worry, this is to be expected... at least you didn't get a backlash!


While you are practicing (yes, you are going to need to practice with this reel), back off on the brake just a little at a time. Eventually you will get more comfortable with the new settings and you should be able to cast farther. Experiment with different settings with the brake and spool. The whole trick to using the baitcasting reel is the use of the thumb. Applying and releasing pressure to the spool with your thumb is the key to this system, and you must master it.


Throwing too hard will snag you up. Throw a moderate distance until you get used to it. As you get better at this, you will see your distance improve. Make sure it is your wrist that is doing the casting. To learn to do this take a small object similar to a pack of smokes, deck of cards, etc., and place it between your inner bicep and your side and practice casting without dropping the object. This will force you to use your wrist primarily and when you get better you can add different arm strokes to suit.


After you've practiced using the suggested adjustments and get a good feel of things, you will gradually be able to reduce the amount of tension and braking force, as you simultaneously "educate" your thumb.


Put your thumb on the line to hold it in place while you click the line release button. Cast the lure by releasing the thumb pressure, but keep the thumb barely touching the line (using your thumb for anything but very lightly feathering of the spool at any other point only cuts down on your distance and isn't the best way to maintain control over the cast; that's what brakes are for).


As the lure reaches its destination, apply more pressure with the thumb as a brake and to keep the line from spooling off into a bird's nest. It takes a lot of practice to get the right touch.


Finally, if you can master the basic cast, and achieve both control and comfort, then it truly becomes a matter of practice and more practice for distance, accuracy and versatility.


Learning Baitcasting Reel - Definitely Worth


Baitcasting reels are some of the most difficult types of reels to learn how to use. The expectation with these types of reels is that you have a clear understanding of the purpose of the cast and the relationship between the cast and control of the reel itself. You are expected to understand how different weights will affect your cast and the operation of the reel. If you do not have the proper skills necessary to use this type of reel it will be an exercise in frustration. Once you have mastered the skills of casting with an open faced model you can move onto using bait casting reels.


Choosing the right type of reel for you is by the most part based on your skill level and your knowledge of reels and how they work. It is all about whether or not you have the right skills for the reel. If you are honest with yourself and choose reels for your skill level, fishing will be a much greater experience for you in the long run.


The great thing about a baitcasting reel is the ability to cast a country mile. Additionally, when you get that heavy weight fish on the line, this reel gives you plenty of confidence to 'play' with the fish. Set the drag so that the fish can pull some line out when it runs, and you will have the time of your life...


The problem with baitcasting reels is backlash or bird's nest. This is a nightmare when you are first learning to use a baitcasting reel. In fact, if you are used to using another reel, don't go fishing without it until you have the baitcaster mastered. Take it even when you do have it mastered because even the pros backlash, and if it happens your new baitcasting reel will probably end up in the garbage with an eternal bird’s nest!!!! The main secret is thumb control. You control the output of the line with your thumb. Your high determination to use this fine piece of equipment, you will eventually get a feel for it.


Whenever a beginner asks for guide in learning how to use a baitcasting reel, most of the so called experts may say: "Practice, practice, practice” or “Practice make perfect” – I knew that!


If we don’t know where to start, all we are doing is getting more and more frustrated. Trial and error may be okay for some people but not me. Making all the possible errors before we figure out the right way, is the worse way of learning. We need to find out the best possible ways of learning before we really start learning - Start at the very bottom of the learning curve and try to master only one thing at a time soon our progress is faster and with less aggravation along the way.


So, what is the best way to tackle these buggers? First, you'll want to make sure it's set up right.


Set-up 1: Don't Overspool

While you are learning the baitcasting reel, do not overspool. Adding too much line, at least until you get used to throwing it, will cause backlash. By adding less line to the reel, less line comes off with every rotation and it's easier to avoid backlashing, especially with mono which has a memory and will loosely coil up around the spool once tension is relieved.


Set-up 2: Make Sure To Get The Right Combo

The lighter the lure you are casting, the shorter the rod you need for the baitcasting reel. Using too long of a rod with a light weight lure will result in backlash.


Set-up 3: Adjust The Spool Tension - as tight as it will go

For now, tighten it to the point where you need to jiggle the rod slightly for the lure/weight to drop some, but without continuing all the way to the ground.This is tighter than usually recommended, but the goal at this point is CONTROL, not the distance.


Set-up 4: Adjust The Brakes On The System

If your reel uses magnetic brakes: Use the adjustment wheel on the side of the reel opposite to the handle and use about 75-80% of the braking force available.


Set-up 5: After finishing with those settings, hold the rod and reel straight out in front of you and click the line release button (thumb bar or push button spool release) to allow the lure to fall straight down to the ground. Start backing off the spool tension until the lure slowly falls to the ground, and when it hits, no more line comes off the spool. This is the correct setting (Put on at least a ½ oz. casting plug (or equivalent). This will give you more of a feel of the rod and reel interaction and make everything easier. Keep the plug/lure snug against the tip of the rod – don’t let it hang down at all at this time)


Now you are ready for your first overhead cast using baitcasting reel……lets get ready


Being Away

To all my dearest "Reel 10 Ball Bearings" visitors and followers,

My sincerest apologies to all my blog visitors and followers due to lack of posting for the past 4 months.

Being away from fishing activities and almost all activities near the water and blogging for past months makes me very,very upsets and frustrating.....

To all my dearest visitors and followers, get ready for new posting starting from this month...yeah!!!!

Monday, June 1, 2009

Buzzbait Fishing Lures


Buzzbait fishing lures is similar to spinnerbait except that it has propeller type device on the upper arm instead of a spinner blade which rotates very quickly when retrieved. Buzz Baits tend to create more attention then most spinners and spoons. Work best when anglers retrieved it fast enough for the propeller to actually break the surface of the water. They tend to create enough "Buzz" that simply makes the lure irresistible for many fish. Their main purpose is to create attention and then tease enough that fish cannot help, but to take the bait. These preferred top water lures allow the angler to cover water faster than most top water lures.


Advantage Buzzbait


Spinnerbait Fishing Lures


Spinnerbait is a wire with a loop in its middle and the arms bent into V-shaped. At the end of top arm is a spinner blade same as what we found on spinners. At the end of the bottom arm is a hook, usually with a lead head for weight and adorned with a skirt for fish attracting device. The hook point rides up which resist snagging in weeds better than any other lures. The popular technique is to retrieve the spinnerbait so that it rides just under the surface, creating a bulge in the surface tension. The combination of noise and flash created by spinner blade and the color and motion of the skirt on the bottom arm resembles the large baitfish which provokes predator fish into striking.


Spinners and Spoons Lures


Classic Spinners and Red/White Spoon


Spinners and Spoon can also be categorized under top water lures. They both imitate baitfish (for the most part) and quite effective as other fishing lures.


Spinners Lures


When spinners is retrieved, the blade spins around the body of the spinner at a very fast rate emitting a great amount of vibration and flash mush like a baitfish in distress. Different shapes and thickness of the blades determine the rate of speed of the blade and how far away from the shaft it spins. Basically there are two types preferable for moving water and still water use. Spinners are best to use and excel in a stream. Spinners start spinning as soon as they hit the water because of the current. Angler can stand in one spot and fish the spinner throughout the water column downstream or upstream; pausing the retrieve in the area that may hold a fish may ensure a good strike. Reel just quickly enough to spin the blade while steering the spinner with your rod tip.


Colonel and MapAglia Spinners


Spoon Lures


Are thin, rounded piece of metal. Spoons are also called wobblers for their side to side movement in the water when retrieved. The spoon design reflects a lot of light and flashes brightly in the water when retrieved imitating a fleeing or distressed baitfish. Spoons cast easily and accurately because of their density. They cut right through any wind present and can travel a good distance through the air. This weight allows spoon to sink to the bottom quickly although they can be fished at any depth.


Yo Zuri Altima Spoon


Tuesday, May 26, 2009

Minnow Imitation Fishing Lures

Minnow imitation fishing lures are more than likely the type of fishing lure that the entire world is the most familiar with. These are the fishing lures that look like bait fish and come in all of the sizes and colors that actual baitfish are available in. These types of fishing lures are also available in various colors and artistic design (luminous, glow in the dark, striking or neutral colors and etc). There are minnow imitation fishing lures that dive a few feet deep to as many as thirty feet deep. Generally each design of minnow may not suit for any type of fish.


You can cover the entire water table with minnow imitations. The most popular of these types of fishing lures has to be Rapala’s. The effectiveness of minnow imitation fishing lures must be lifelike and realistic either in design itself or during diving and retrieve. Expensive fishing lures will not guarantee to be the best fishing lures.

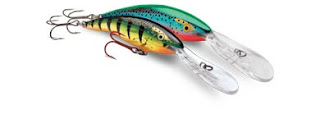
Minnow imitation fishing lures also called floater diver plugs which float at rest but dives beneath the surface when retrieved. The main characteristic of this type of fishing lures are the feature lip either made by metal or plastic (although some don’t have lip). The lip looks like a scoop-shaped device located in front of the lure. Lip allows the lure to dive and impart action making it vibrate, wiggle or gyrate when retrieved.


Minnow imitation fishing lures descend to various depths depending on the model. The size of the lip determines how deep the lure will dive; the longer the lip, deeper it will go.


Shallow Diver Minnow


The lure that dives between 0.5m up to 2.7m but sometime some of the design can dive to more than 3 m and still called shallow diver. Float at rest, and dive depending on the retrieve speed.


Shallow Diver Minnow


Deep Diver Minnow

Dive relatively deep, more than 3 meters and float at rest although some didn’t float at all. Most lure of this type have large lip that allow them to dive deep although some don’t have lip but built with internal sinkers. Crankbait is one of them.

Deep Diver Minnow